Curriculum Matrix
Lesson Plan
Desktop Greenhouses (Grades 3-5)
Grade Level
Purpose
Students investigate the importance of light to plants by creating a desktop greenhouse investigation and exploring the process of photosynthesis. Grades 3-5
Estimated Time
Materials Needed
Engage:
Activity 1: Do Plants Need Light?
- Desktop Greenhouses video
- 16-ounce clear plastic cups with lids*, 2 per group
- 18-ounce black plastic cups*, 2 per group
- Black electrical tape*
- Black card stock* disks, 2 per group
- mL measuring cup or ruler
- 1/8 teaspoon
- Jiffy 7 peat pellets*, 2 per group
- Seeds* (we tested alfalfa and lettuce seeds)
- Labels, 2 per group
- White 5mm LED lights*, 1 per group
- 3-volt coin cell batteries*, 1 per group
- Craft knife
- Desktop Greenhouse Observation Sheets, 1 packet per student
*These items are included in the Desktop Greenhouses Kit, which is available for purchase from agclassroomstore.com.
Activity 2: Why is Light Important for Plants?
- The Magic School Bus Gets Planted: A Book About Photosynthesis by Joanna Cole and Lenore Notkin
- Science notebook
- Photosynthesis Interactive Science Notebook Packet
- Glue sticks
- Scissors
- Interactive Periodic Table
- Molecular Model Cards, 6 carbon dioxide cards, 6 water cards, 6 oxygen cards, and 1 glucose card per group
- Atom Disks, 12 hydrogen atoms, 6 carbon atoms, and 18 oxygen atoms per group
- Flashlights, 1 per group
Vocabulary
aquaponics: a system of aquaculture in which the waste produced by farmed fish or other aquatic animals supplies nutrients for plants grown hydroponically, which in turn purify the water
by-product: an incidental or secondary product made in the manufacture or synthesis of something else
chlorophyll: the green substance in plants that allows them to use the energy from the sun
chloroplast: one of the parts in a plant cell that contain chlorophyll and in which photosynthesis takes place
grow light: an artificial light source designed to stimulate plant growth by emitting a light appropriate for photosynthesis
hydroponics: the method of cultivating plants using a mineral nutrient solution in a water solvent without the use of soil
indoor farming : a method of growing crops or plants, usually on a large scale, entirely indoors
nutrient: a substance that provides nourishment essential for growth and the maintenance of life
photosynthesis: the process by which plants convert carbon dioxide, water, and light energy into sugars and oxygen in order to store energy; the opposite of cell respiration
respiration: the process through which a plant exchanges oxygen and carbon dioxide with its environment
stomata: small openings in the leaves and stems of plants which can open and close to exchange oxygen and water vapor for carbon dioxide
vertical farming: the practice of growing plants and produce in a vertical orientation, maximizing the use of the location's space
Did You Know?
- NASA pioneered the use of LEDs (light-emitting diodes) for growing plants as a result of their research on the best lighting technology to produce edible crops in space.4
- Between 2010 and 2014, the price of LEDs dropped by 90 percent, while their efficiency and their lifespan nearly doubled.5
- Plants aren't the only organisms that perform photosynthesis. Algae, cyanobacteria, and some protists also make sugar via photosynthesis. Some multicellular animals such as the sea slug, the spotted salamander, and the oriental hornet are also photosynthetic.6
Background Agricultural Connections
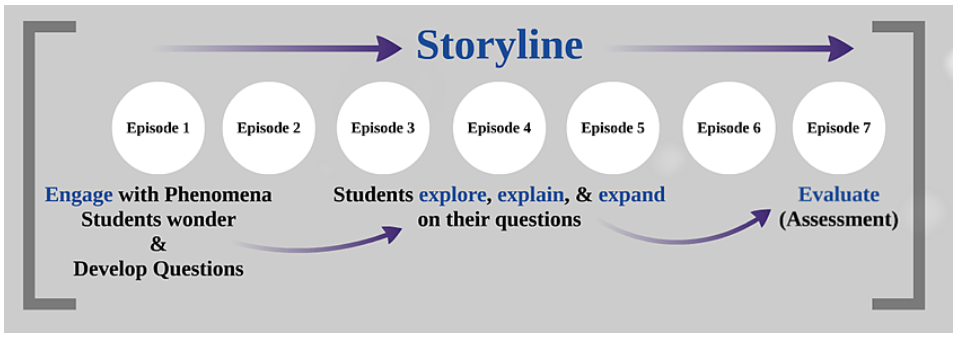
This lesson is easily nested into a storyline as an episode exploring the phenomenon of photosynthesis. In this episode, students investigate the question, "Why is light important for plants?" Keep in mind that phenomena-based lessons include storylines which emerge based upon student questions. Other lesson plans in the National Agricultural Literacy Curriculum Matrix may be used as episodes to investigate student questions needing science-based explanations. For more information about phenomena storylines, visit nextgenstorylines.org.
Plants require nutrients, water, air, and light to survive and grow. Nutrients are the vitamins and minerals plants need for healthy growth. They come from the decomposition of rocks, dead plants, and animals and are absorbed through the roots and transported to the rest of the plant through the stem. Water helps keep plants rigid and transport nutrients throughout the plant. Air enters the plant through tiny holes in the leaves called stomata. The roots absorb oxygen to convert food into energy, a process called respiration. Plants use energy from light to make food. In nature, plants typically get nutrients from soil, water from rain, carbon dioxide and oxygen from the air surrounding them and from air pockets in the soil, and light from the sun. It is important to understand that plants do not need soil and sun. They need nutrients and light, which can be provided from the soil and sun or other, sometimes artificial, sources.
Photosynthesis is the process by which green plants and certain other organisms transform light energy into chemical energy. Plants use the energy of light to convert carbon dioxide and water into sugar (glucose) and oxygen. Carbon dioxide is absorbed by the leaves through the stomata. Water enters the plant at its roots and travels through the stem to reach the leaves. The leaves are the primary site where the photosynthesis process takes place. Inside the leaf cells are structures called chloroplasts. Each chloroplast contains chlorophyll, a chemical that gives leaves their green color. When the leaves receive light, chlorophyll captures the light's energy and stores it to eventually be used to convert water into hydrogen and oxygen. The water's hydrogen and oxygen atoms are combined with the carbon dioxide's carbon and oxygen atoms to create glucose molecules which are used by the plant to produce its food. Oxygen, a byproduct of the photosynthesis process, is released into the atmosphere through the stomata. In plants, photosynthesis only occurs in the presence of light.
Light requirements vary by plant species. Green plants need light to perform photosynthesis, although the intensity, quality, and duration needs will differ by plant. Understanding the light preferences of a plant is important when choosing an appropriate planting location and/or light source.
A grow light is an artificial light source designed to stimulate plant growth by emitting a light appropriate for photosynthesis.1 The purpose of a grow light is to replicate the natural solar spectrum of sunlight or to provide a light spectrum tailored to the needs of a particular plant. There are three main types of grow lights—fluorescent, LED (light-emitting diodes), and HID (high-intensity discharge).2 Grow lights differ from traditional light bulbs that are used to light homes. Unlike a traditional light bulb, grow lights produce the full spectrum of light and appropriate intensity necessary for photosynthesis. Grow lights also produce less heat than a traditional bulb, which prevents the scorching of plants.
Plants differ in their light intensity requirements. For grow lights, light intensity is determined by a bulb's brightness and the proximity of the light source to the plant. Plants native to tropical jungles or shady forests typically require less light as compared to plants from dry, sunny climates.
All plants need a rest from light. Respiration, an important part of a plant's growth process, occurs when it's dark. Botanists usually divide plants into three categories relating to their preferred day length—short-day plants grow best with less than 12 hours of light per day, long-day plants require 14-18 hours of light per day, and day neutral plants depend on 8-12 hours per day all year long.
Indoor farming is a method of growing crops or plants, usually on a large scale, entirely indoors.3 This method of growing crops utilizes grow lights or a combination of artificial light and sunlight in a greenhouse setting. Aquaponics, hydroponics, and vertical farming are all examples of indoor farming approaches. Indoor farming is particularly popular in urban areas where less land is available for growing crops or soil is contaminated. The crops grown in indoor farms can be used to boost local food supplies, provide locally-grown fresh food throughout the year, and provide access to nutritious food. Indoor farming enables growers to have increased control over the environment when compared to traditional growing conditions.
Engage
- Ask the students, "Where is the food you eat grown?" (On a farm or in a garden.)
-
Project the image of a big city onto a large screen. Ask the students, "Can food be grown here?"

- Show the students the first 2 minutes and 18 seconds of the video Ski Town Turns Car Park into Vertical Farm for Local Jobs/Food.
- Ask the students to consider the question, "How are the plants in the video's indoor farm growing inside a building?"
- Explain to the students that they are going to investigate how plant needs can be met in an indoor farm.
Explore and Explain
|
This lesson investigates the phenomenon of photosynthesis. Natural phenomena are observable events that occur in the universe that we can use our science knowledge to explain or predict.
|
Activity 1: Do Plants Need Light? (Episode Question 1)
Teacher Note: We recommend beginning this investigation on a Friday (Day 1) to allow for germination of the seeds over the weekend. Lights will be added to the greenhouse the following Monday (Day 4), plant observations and data collection take place throughout the week, and the investigation will be completed the following Friday (Day 8). This schedule allows for key procedures to take place on school days as opposed to the weekend.
Day 1
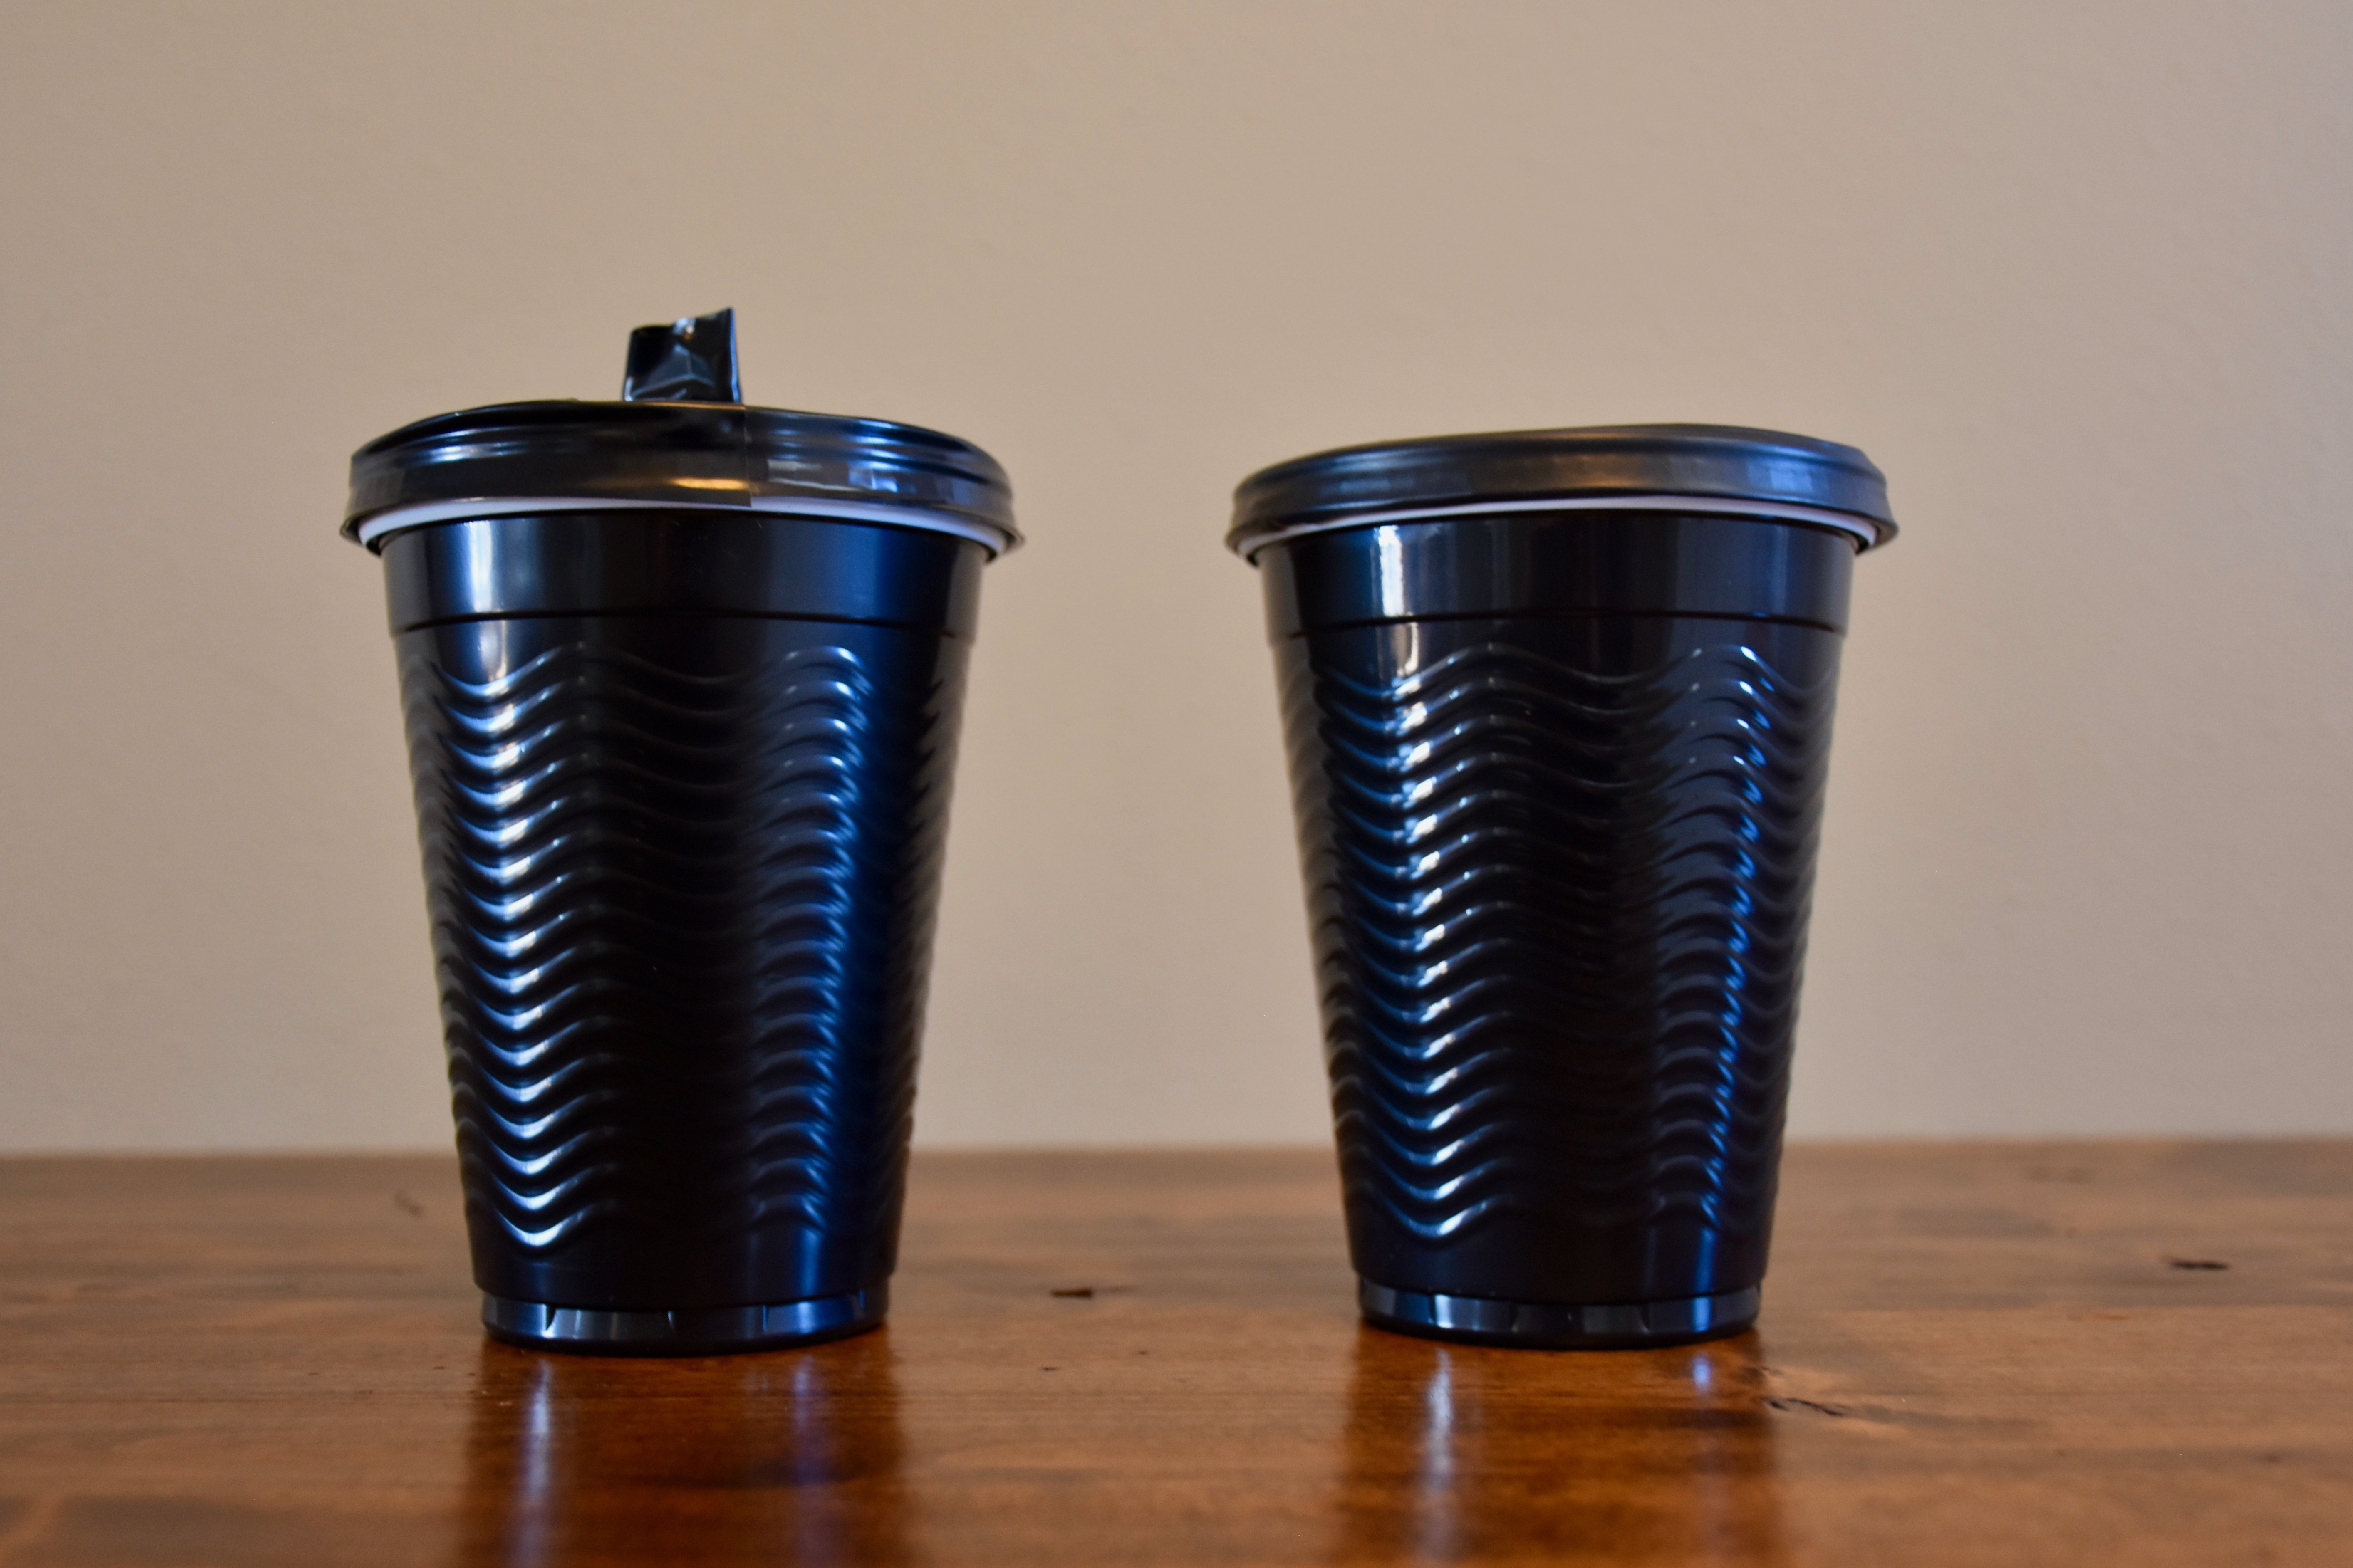
Preparation instructions: Prior to this activity, an adult should prepare the desktop greenhouse lids. For each lid, cut out a lid-sized disk from black card stock, place on top of the lid, and secure it with two layers of electrical tape so that no clear part of the lid is exposed. Watch the Desktop Greenhouses video to view a tutorial on how to set up the greenhouses.
- Explain to the students that they are going to investigate the importance of light to plants by creating desktop greenhouses.
- Organize the students into partners or small groups. Provide each group with 2 clear plastic cups, 2 black plastic cups, 2 prepared lids, 2 labeling stickers, 2 peat pellets, a bag of seeds, access to water, a mL measuring cup, a 1/8 teaspoon, and a permanent marker.
- Instruct the students to label both clear plastic cups with their name, the date, and the type of seed they are planting. Label one greenhouse with the number 1 and the other greenhouse with the number 2.
- Fill each of the cups with 50 mL of water or mark a line on each cup 3/4 inch from the bottom and fill the cups up to the line with water.
- Place a peat pellet, with the small hole facing up, into each of the cups of water.
- It takes about 15 minutes for the peat pellets to hydrate and expand. When the peat pots are completely hydrated, use a pencil to loosen the top 1/4 inch of peat moss.
- Evenly spread 1/8 teaspoon of seeds on top of each of the peat pots. Press the seeds down gently with your finger so that they contact the damp peat.
- Have each group write their names, the date, and the type of seed they are planting on two stickers and place one on each of the black plastic cups. Label one greenhouse with the number 1 and the other greenhouse with the number 2.
- Provide each student with the Desktop Greenhouse Observation Sheets. Have the students complete the observations for Day 1.
- Put the clear cups inside the black cups (be sure to match the numbers correctly 1 or 2) and place a prepared lid onto each of the greenhouses.
- Place the greenhouses onto a countertop or table out of the way of direct sunlight.
- Ask the students if they think seeds need light to germinate. After listening to the students' responses, explain that they will allow time for the seeds to germinate in the dark greenhouses and check the progress on Day 4. Do not open the greenhouses until Day 4.
Day 4
Preparation Instructions: Prior to this activity, an adult should use a craft knife to cut an X (similar to the straw X in the plastic lid) into the top of the greenhouse lid through the black card stock disk and plastic lid for each student's greenhouse number 1 lid only. Do not cut an X for greenhouse number 2. The students will place their LED light through this X.
- Have the students check their greenhouses and complete the observations for Day 4 on their Desktop Greenhouse Observation Sheet.
- Lead a discussion about the question from Day 1, "Do seeds need light to germinate?" Integrate the following points into the discussion:
- The seeds in the desktop greenhouses were not exposed to light and germinated.
- Most seeds germinate best in dark conditions.
- Seeds are dormant until they are exposed to specific conditions.
- Seeds require the proper amount of warmth, moisture, and air to germinate.
- Ask the students, "Do plants need light to grow and be healthy?" After listening to the students' responses, explain that they will add an LED light to one of their greenhouses.
- Provide each student with a 3-volt battery, an LED light, and a 4" piece of black electrical tape. Explain to the students that the battery will provide power to the LED light.
- Have the students straddle the light's prongs
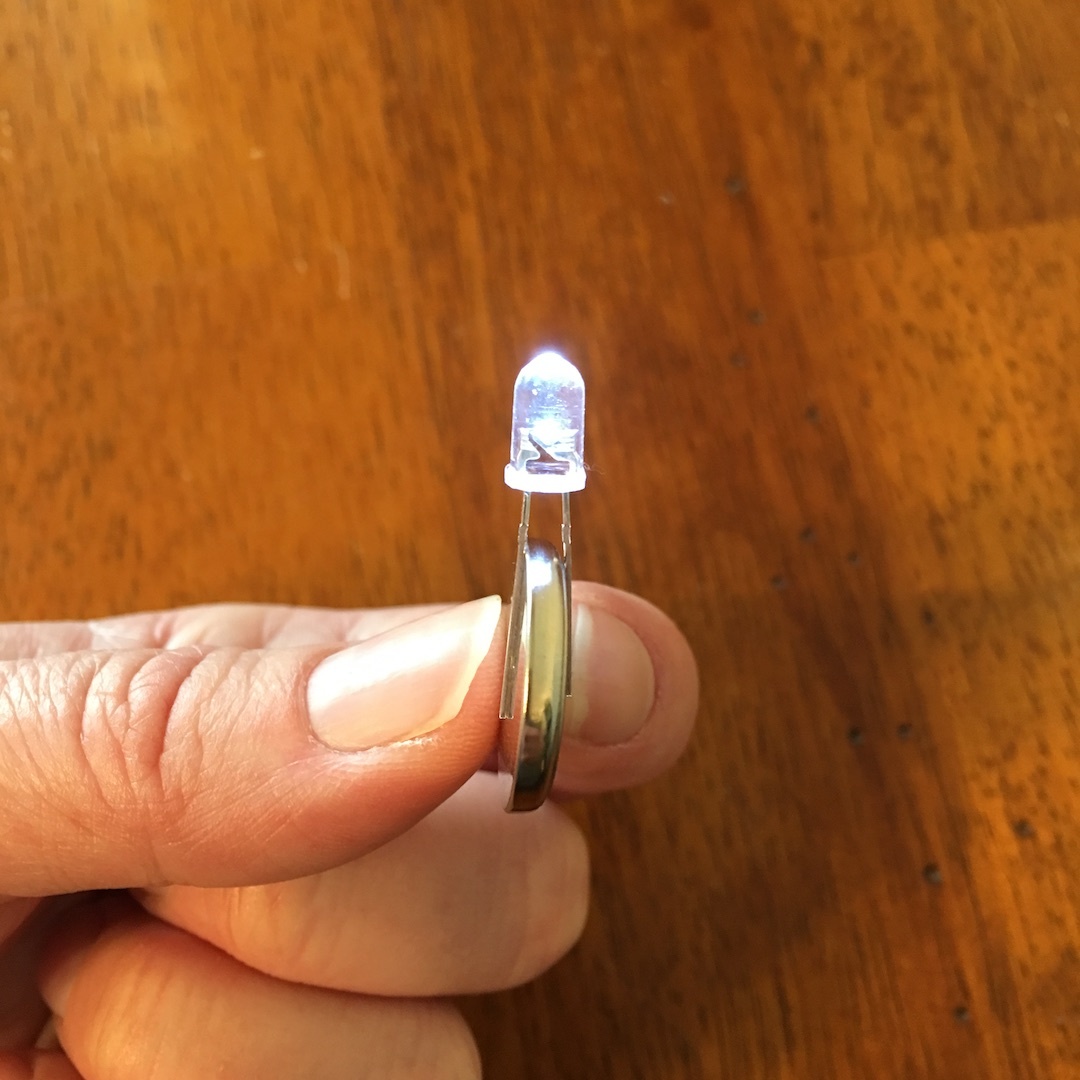 around the battery so that the longer prong is touching the positive side of the battery. Once the light is lit, hold the prongs in place by wrapping the electrical tape around the prongs and battery.
 - Insert the light into the X on the greenhouse lid.
- Explain to the students that they will observe any changes in the plants for the next four days.
- Ask the students, "Do you think you will see any differences between the plant growing in the greenhouse with the light and the plant in the dark greenhouse?" If they answer yes, ask them what kind of differences they think they will see. Have the students predict which plant they think will be healthiest and record their prediction on their observation sheet.
Days 5-8
- Allow time each day for students to observe their plants.
- Have the students record their observations on their Desktop Greenhouse Observation Sheet.
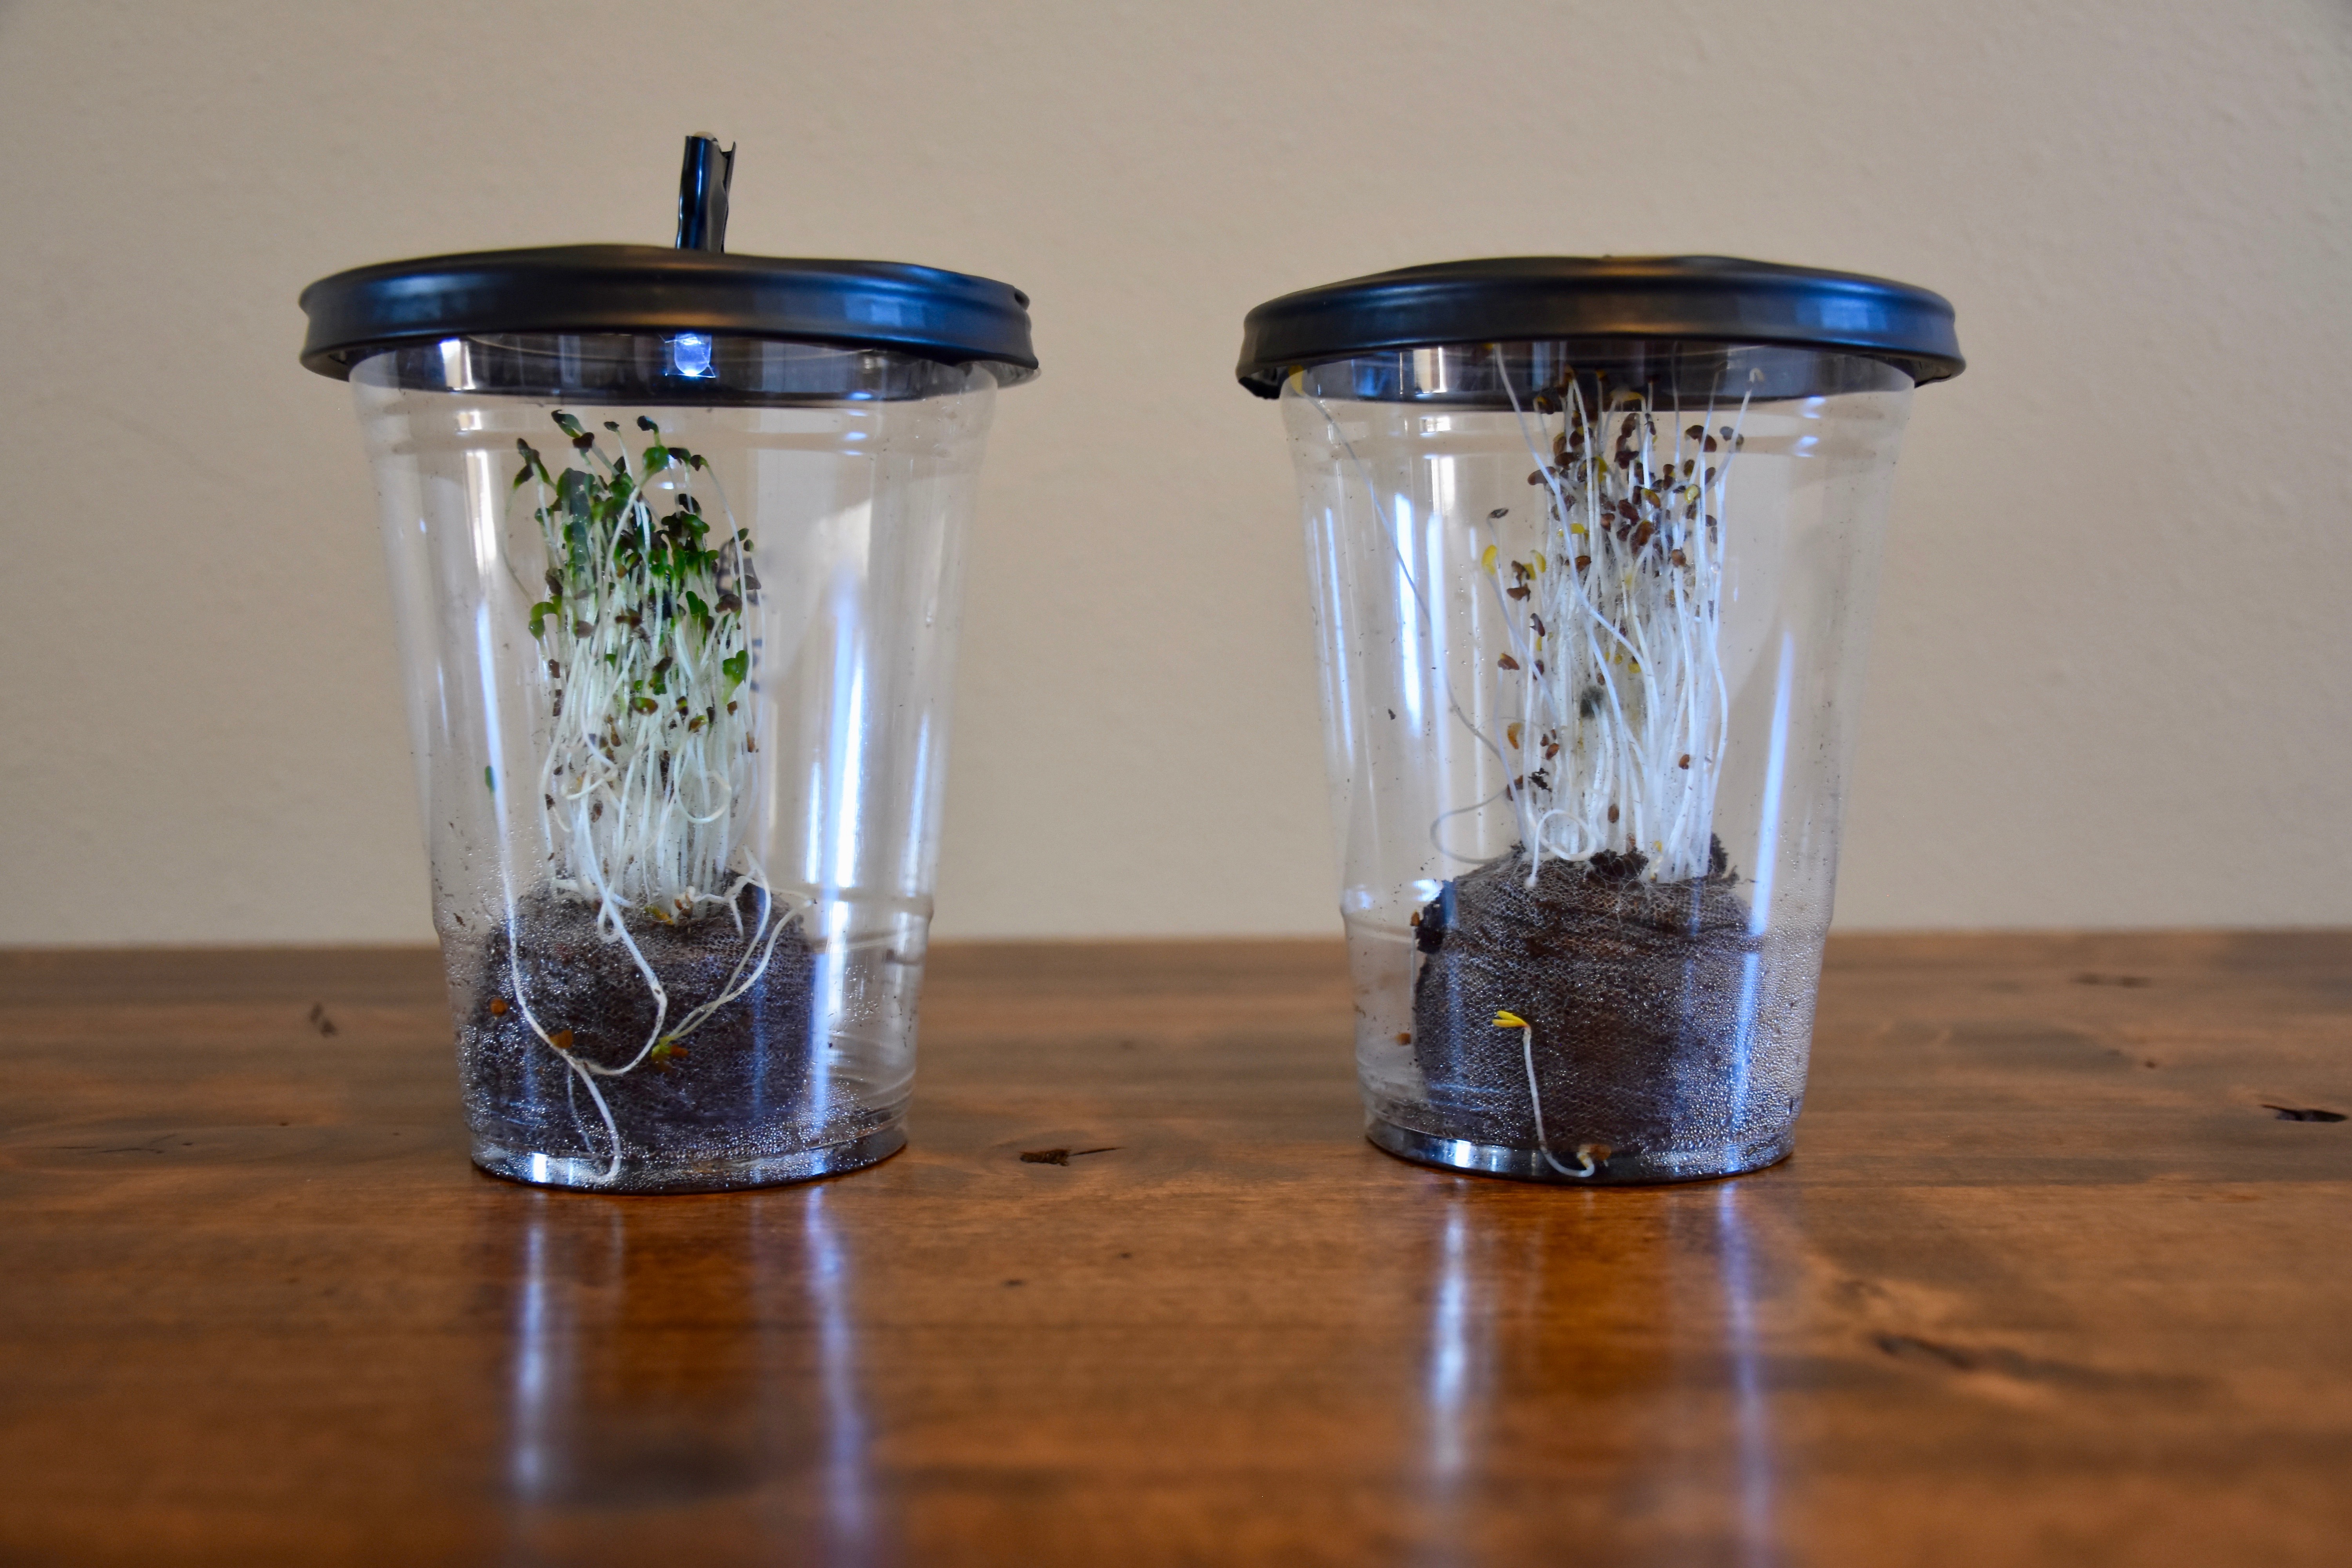
- On Day 8, discuss the differences the students observed between their plant growing in the greenhouse with the light and their plant in the dark greenhouse. Which plant is the healthiest? Was their prediction correct?
- Have the students record their conclusions on their observation sheet.
- Lead a discussion about the question from Day 4, "Do plants need light to grow and be healthy?" Integrate the following points into the discussion:
- The plants in the desktop greenhouses with light were healthier than the plants in the dark greenhouses.
- Plants require nutrients, water, air, and light to survive and grow.
- Light requirements—intensity, quality, and duration—vary by plant species.
- Not all light bulbs can be used as grow lights.
- Plants also need a rest from light.
- Different plant species require different amounts of light each day.
|
Three Dimensional Learning Proficiency: Crosscutting Concepts Students link different domains of science fields into a coherent and scientifically-based view of the world. Structure and Function: The way an object is shaped or structured determines many of its properties and functions. |
Activity 2: Why is Light Important for Plants? (Episode Questions 2-4)
- Ask the students, "Why is light important for plants?" After listening to the students' responses, explain that they are going to explore this question.
- Read The Magic School Bus Gets Planted: A Book About Photosynthesis by Joanna Cole and Lenore Notkin.
- Repeat the question, "Why is light important for plants?" (Plants use energy from light to make food through a process called photosynthesis.)
- Provide each student with a Photosynthesis Interactive Science Notebook Packet. Instruct the students to cut out the "Plant Diagram Cards."
- Using a glue stick, have the students glue the plant card onto a page of their science notebook.
- On the other four label cards, fold on the line, apply glue to the back of the tab, and attach the cards around the plant card so the light card is above the plant, the water card is below the plant, and the oxygen and carbon dioxide cards are along the side of the plant.
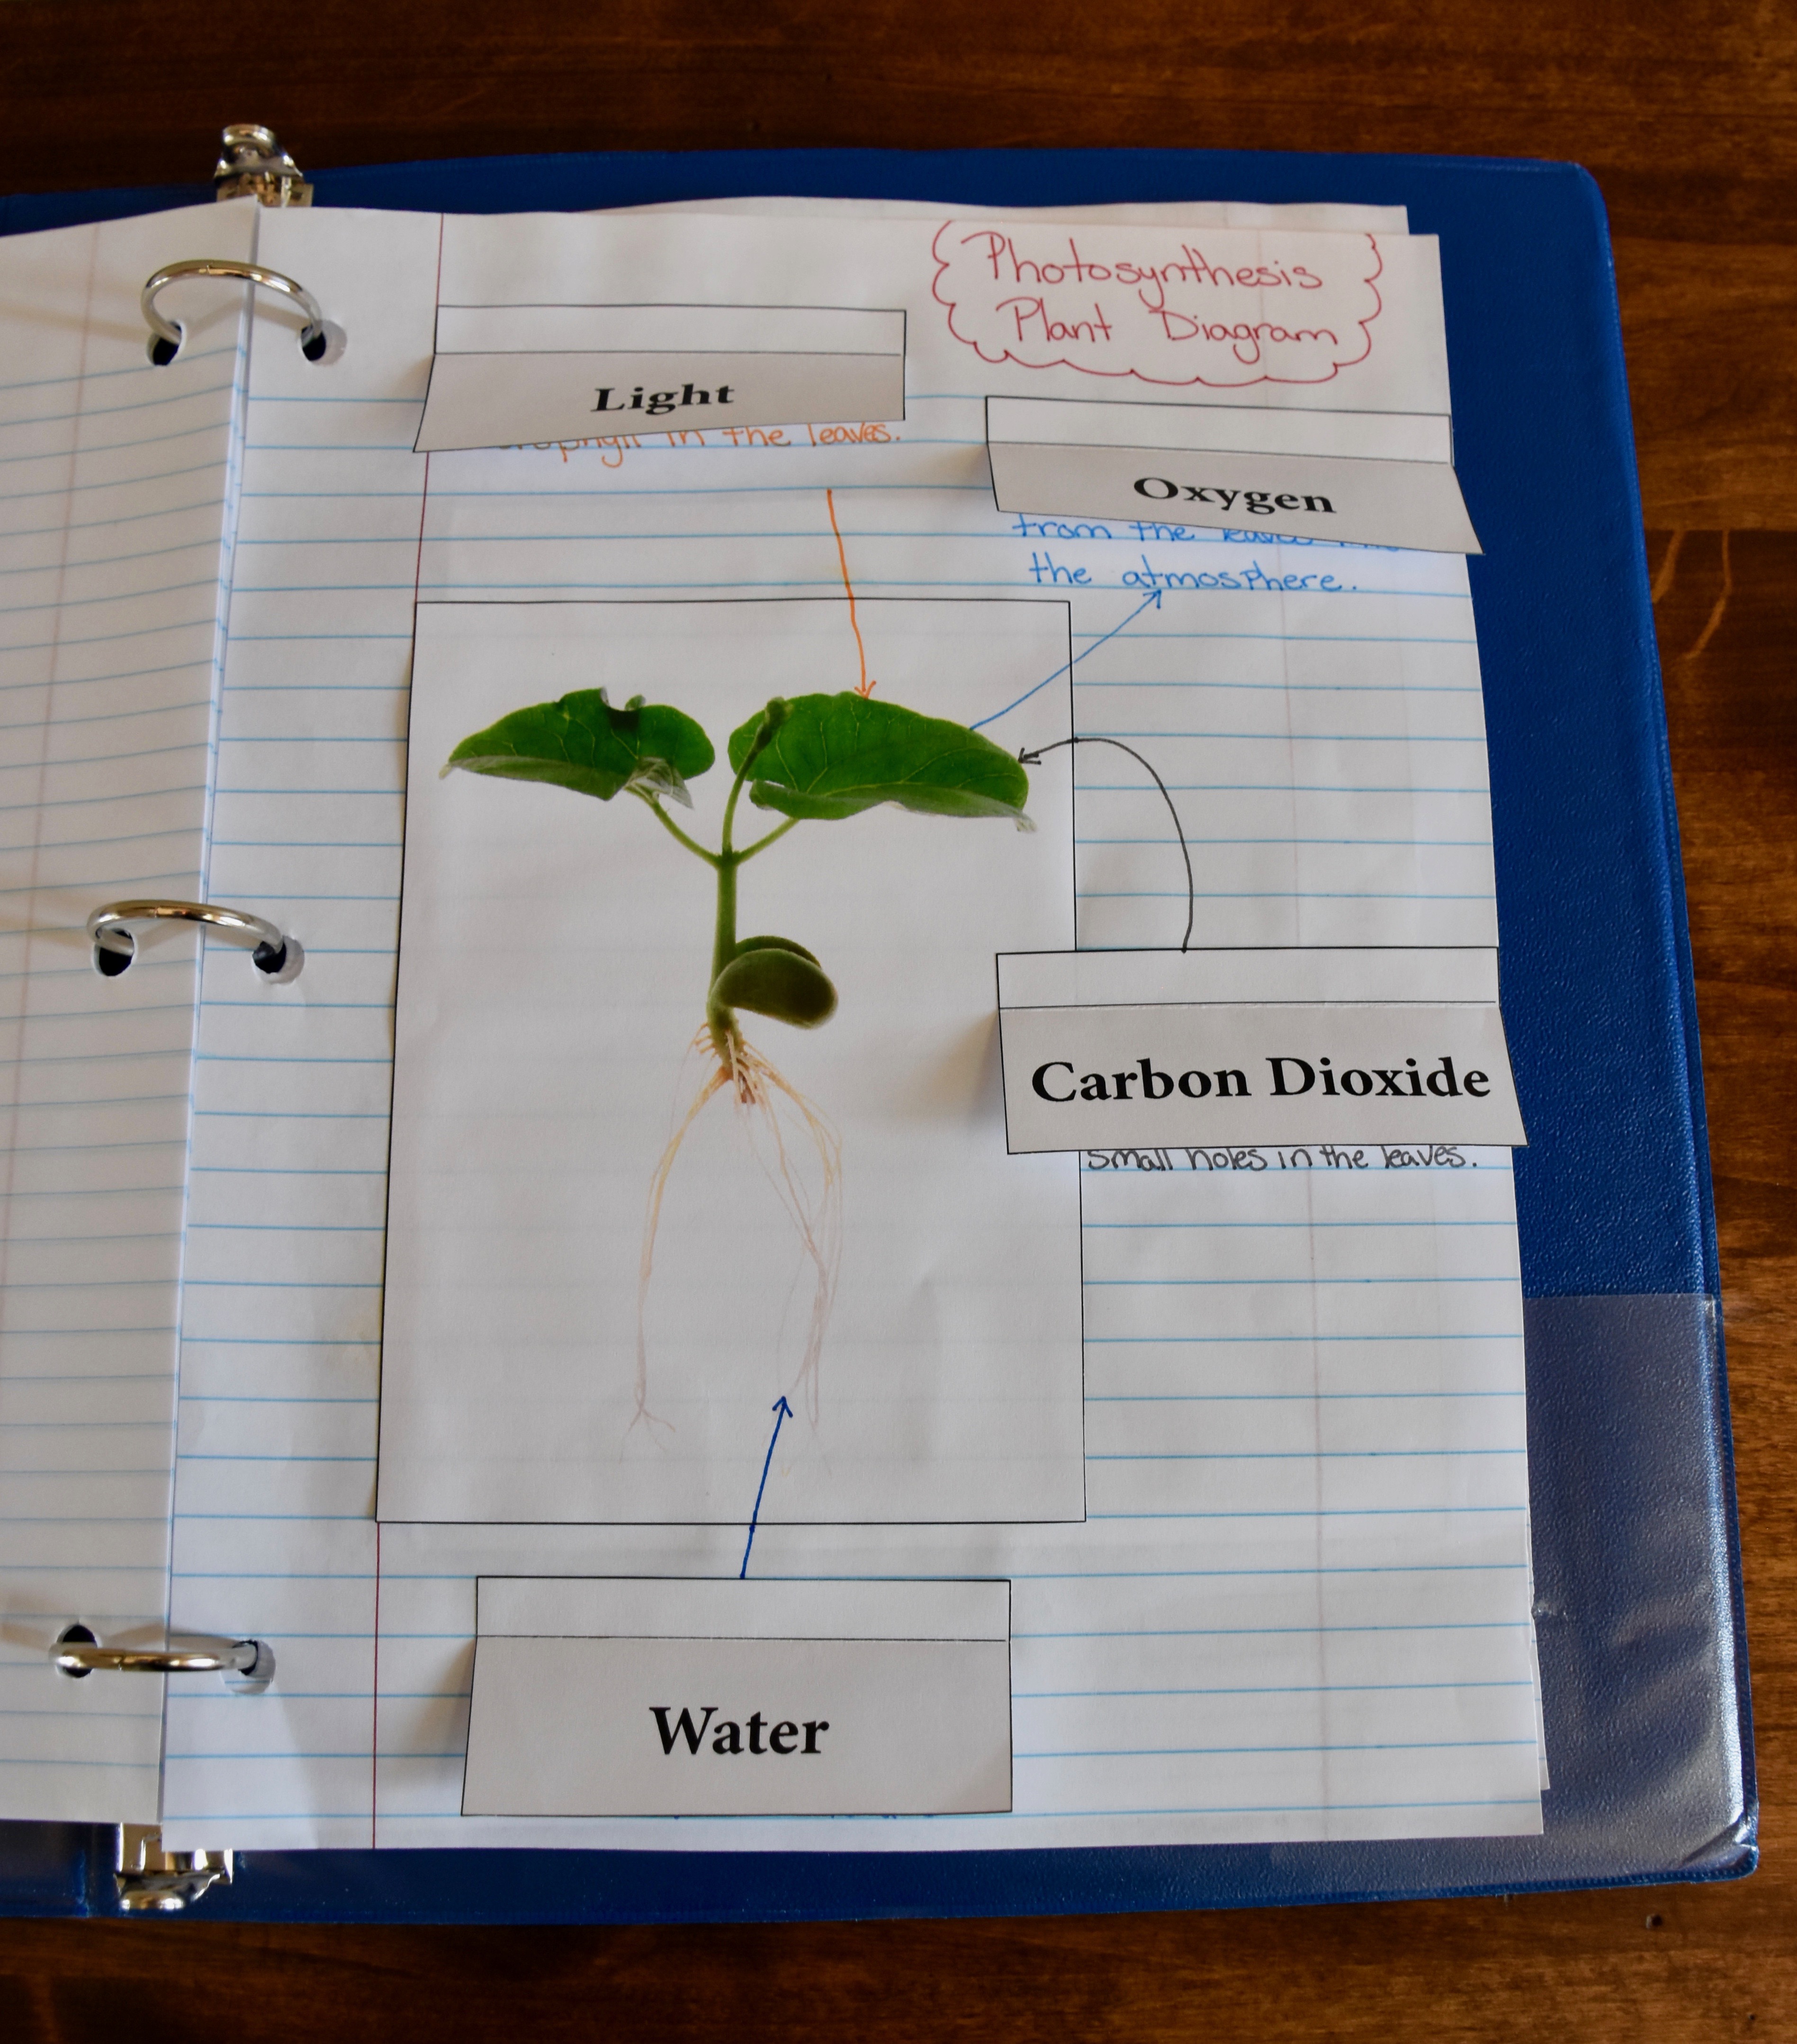
- Underneath the label cards, describe the role each element plays in the photosynthesis process. Draw arrows to or from each label card to the part of the plant that is affected.The descriptions and arrows should be similar to the following:
- Light: Light is absorbed by the chlorophyll in the leaves. (Draw an arrow from the "Light" card to the leaf.)
- Oxygen: Oxygen is released from the leaves into the atmosphere. (Draw an arrow from the leaf to the "Oxygen" card.)
- Carbon Dioxide: Carbon dioxide from the air passes through small holes in the leaves (stomata). (Draw an arrow from the "Carbon Dioxide" card to the leaf.
- Water: Water is absorbed by the roots and travels through the stem to the leaves. (Draw an arrow from the "Water" card to the roots.)
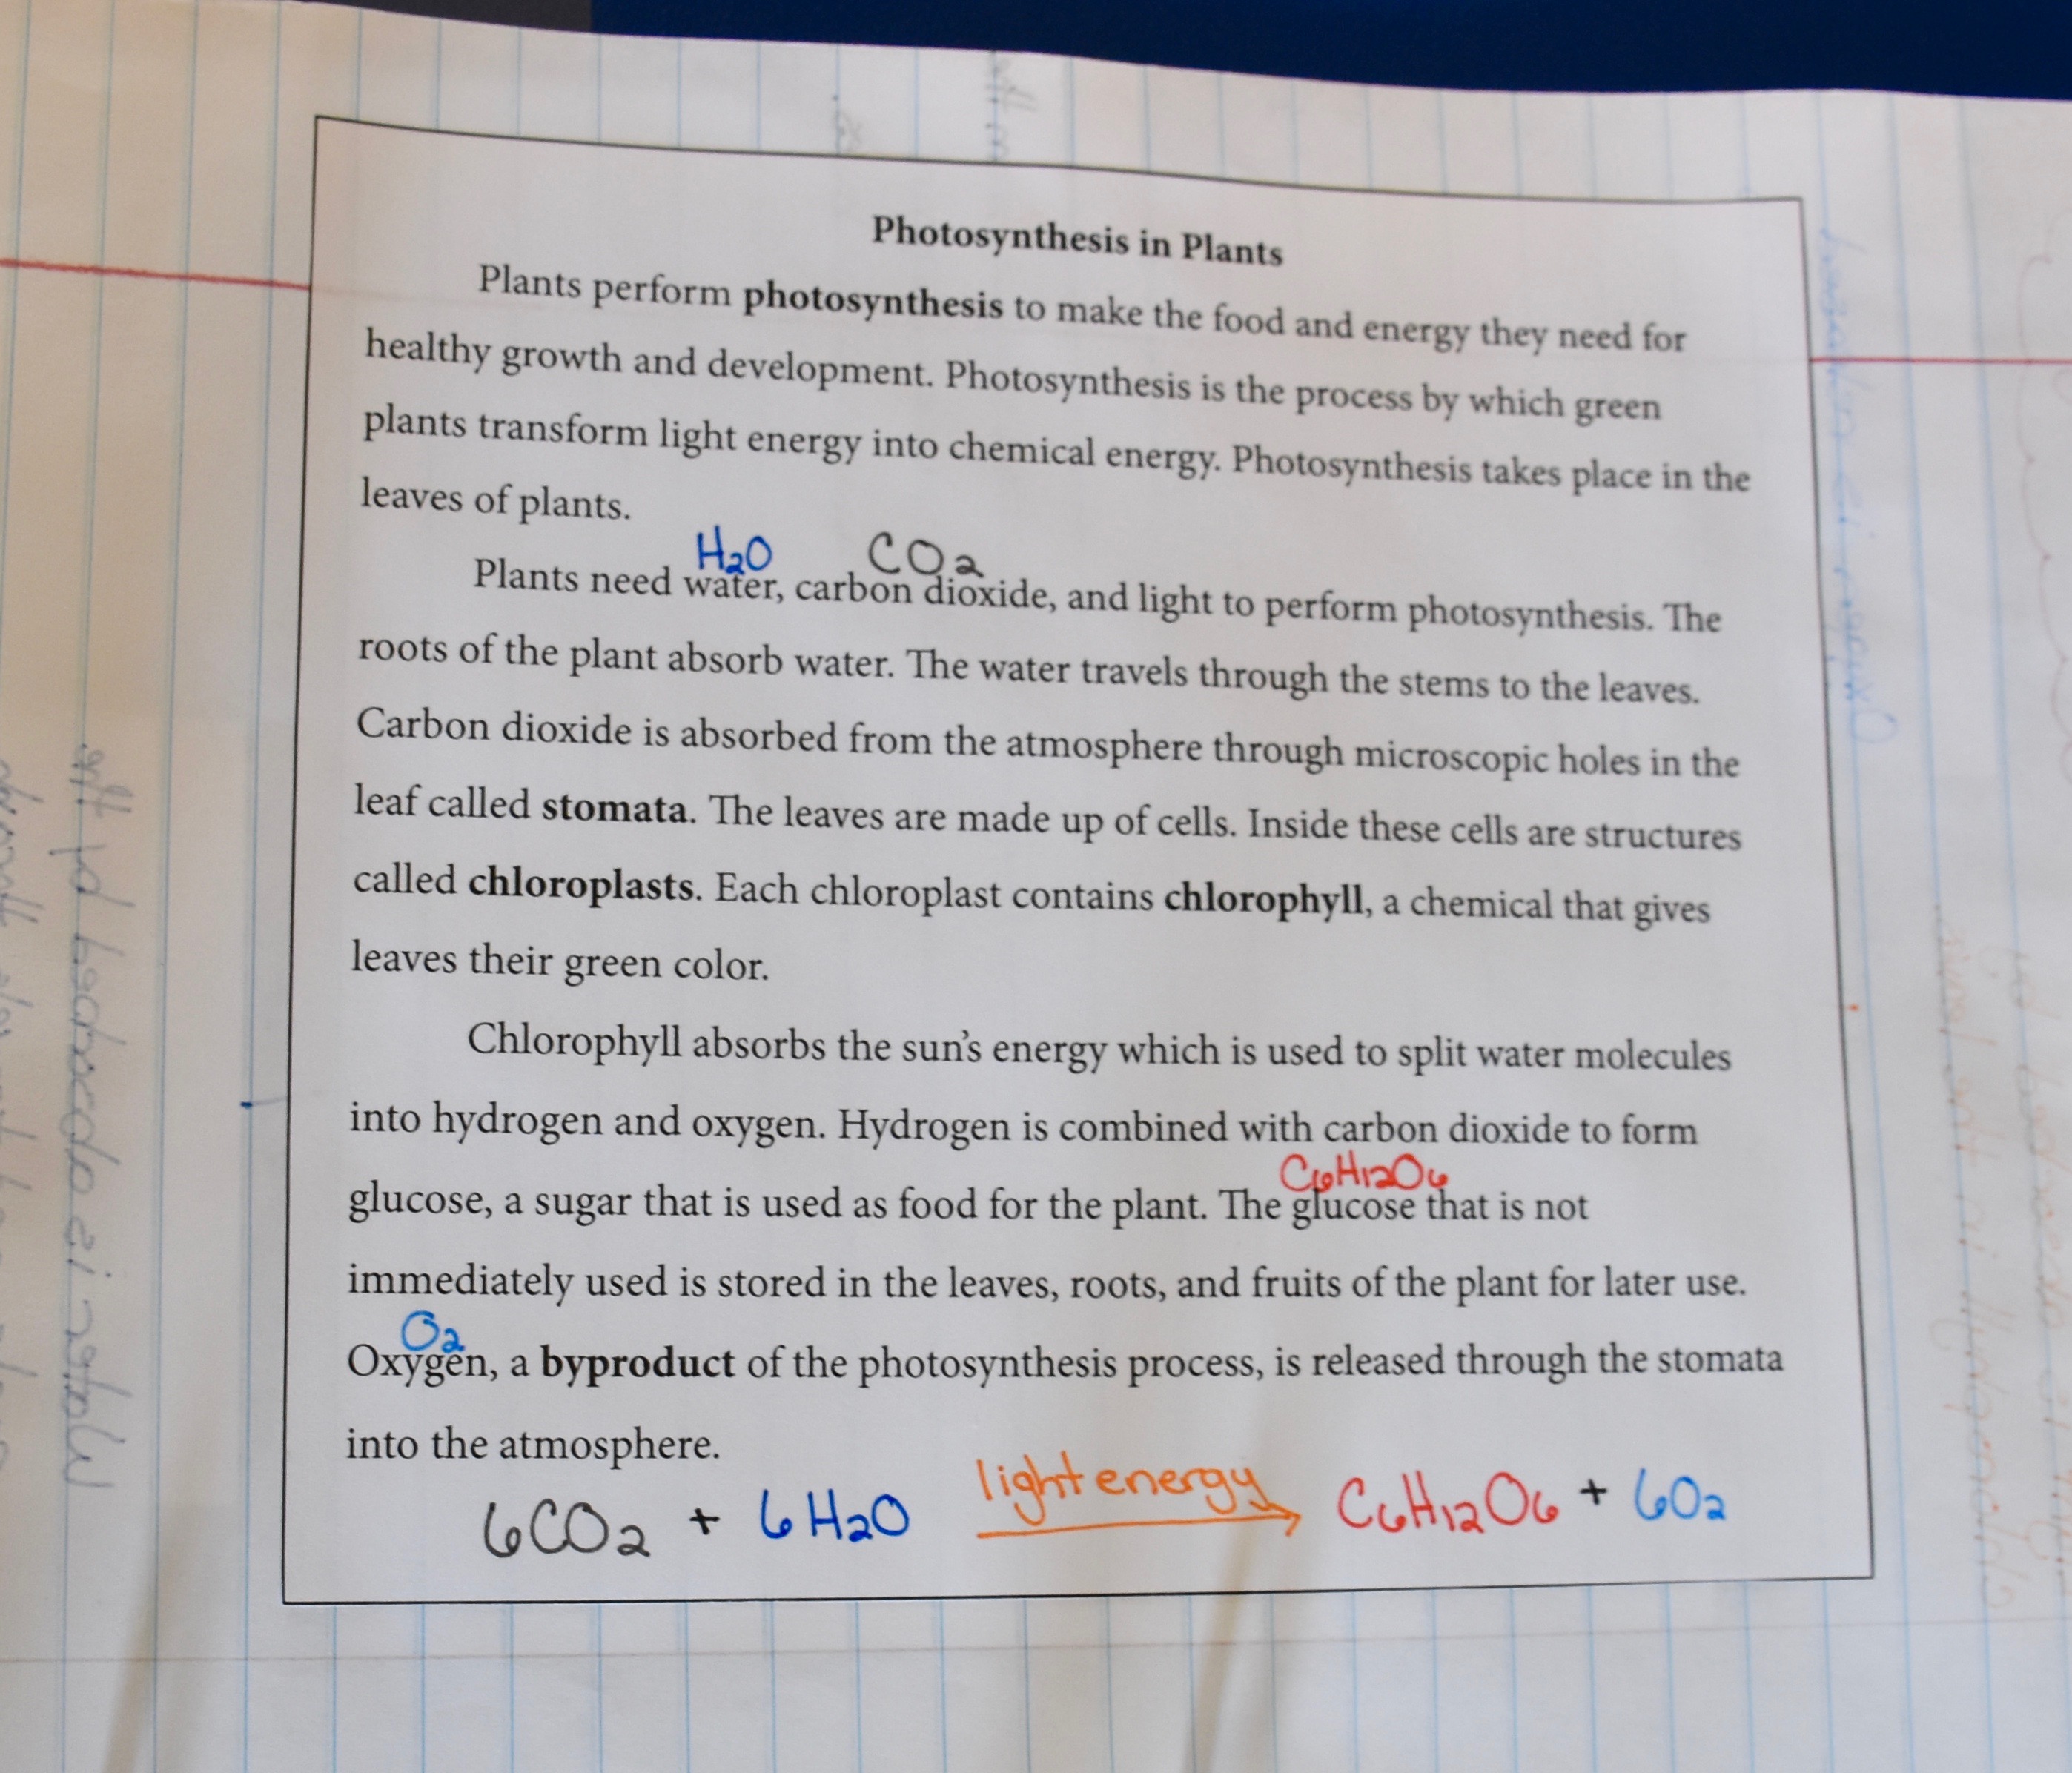
- Allow time for the students to cut out and read the "Photosynthesis in Plants Reading." Discuss the definitions of any unfamiliar words. Have the students glue the reading onto the next page in their science notebooks.
- Instruct the students to cut out the "Leaf Diagram" shapes and glue the bottom leaf (the leaf with the chloroplasts) onto the next page in their science notebooks. Apply glue from the stem to the line on the bottom leaf. Attach the top leaf to the bottom leaf and fold the top leaf open at the glue line.
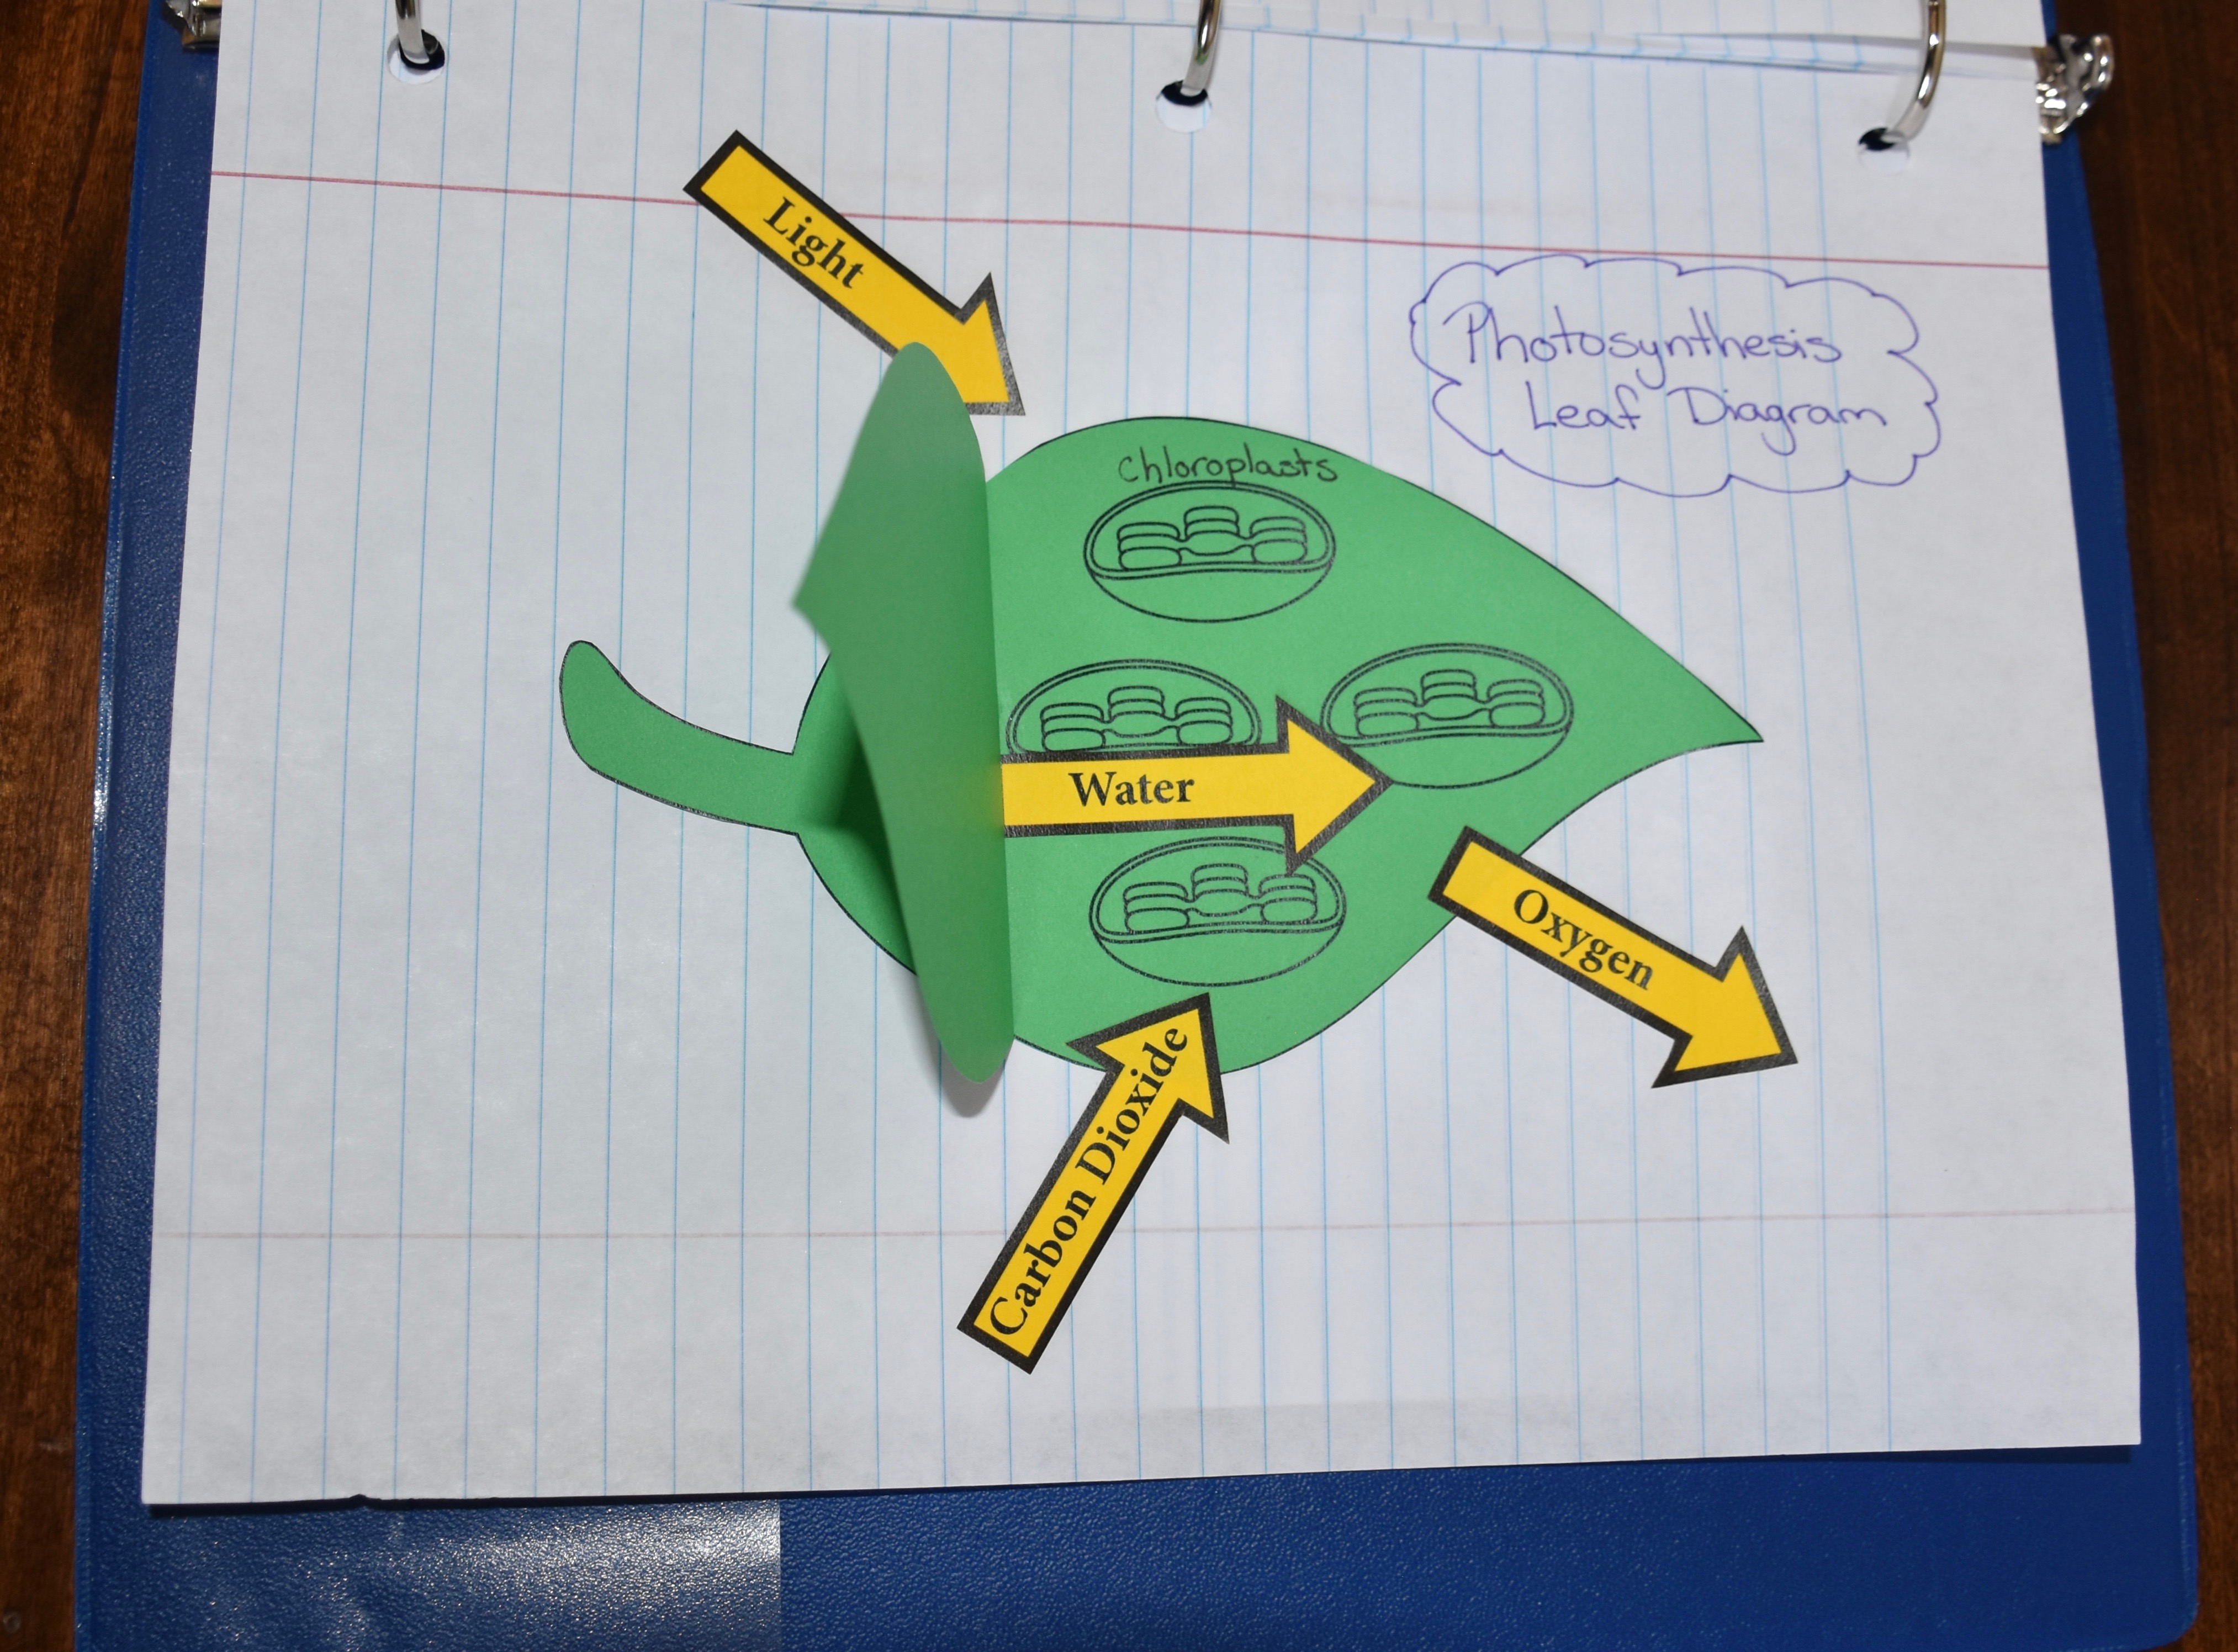
- Have the students cut out the "Arrows" and attach them to the leaf diagram to show how light, water, and carbon dioxide enter the leaf and how oxygen leaves the leaf.
- Show the students the Interactive Periodic Table and point out that it is a display of all of the known chemical elements. Locate hydrogen (H), oxygen (O), and carbon (C) on the periodic table.
- Help students understand that atoms are the smallest amount of an element and molecules are combinations of atoms connected by chemical bonds. Help the students record the chemical formulas of each molecule in the "Photosynthesis in Plants Reading"—water (H2O), carbon dioxide (CO2), glucose (C6H12O6), and oxygen (O2). Clarify that the number in the formula indicates the number of atoms of that element in the molecule. For example, H2O contains two atoms of hydrogen.
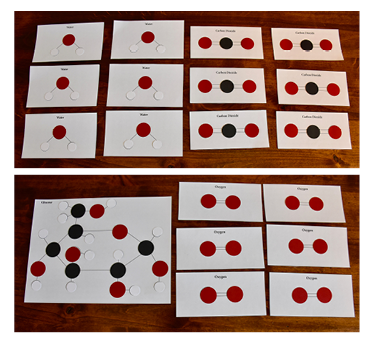
- Organize the class into partners or small groups. Provide each group with Molecular Model Cards — 6 carbon dioxide cards, 6 water cards, 6 oxygen cards, and 1 glucose card. Pass out a section of Atom Disks—12 hydrogen atoms, 6 carbon atoms, and 18 oxygen atoms—for the groups to cut out.
- Have the students place the atoms onto the water and carbon dioxide molecular models. Turn off the lights and tell the students to shine their flashlights on the models to simulate light energy. Explain that, using light energy, the water molecules are split into hydrogen and oxygen. Hydrogen is combined with carbon dioxide to form glucose and oxygen. Instruct the students to transfer the atoms from the water and carbon dioxide molecules to the glucose and oxygen molecules.
- Help the students write the balanced chemical equation for photosynthesis on the bottom of their "Photosynthesis in Plants Reading" (6CO2 + 6H2O -Light Energy-> C6H12O6 + 6O2).
- Review the following with the students:
- The chlorophyll in a plant's leaves absorbs the energy from light.
- The light energy is used to split water molecules into hydrogen and oxygen.
- The hydrogen is combined with carbon dioxide to form glucose.
- Glucose is a sugar that is used as food for the plant or stored by the plant for later use.
- Oxygen is released through the stomata into the atmosphere.
- Invite the students to use their understanding of photosynthesis to write an explanation for the differences they observed in their plants from Activity 1.
|
Three Dimensional Learning Proficiency: Crosscutting Concepts Students link different domains of science fields into a coherent and scientifically-based view of the world. Energy and Matter: Tracking energy and matter flows into, out of, and within systems helps one understand the system's behavior. |
Evaluate
After conducting these activities, review and summarize the following key concepts:
- Plants require nutrients, water, air, and light to survive and grow.
- Photosynthesis is the process by which green plants and certain other organisms transform light energy into chemical energy.
- Plants use the energy of light to convert carbon dioxide and water into sugar (glucose) and oxygen.
- A grow light is an artificial light source designed to stimulate plant growth by emitting a light appropriate for photosynthesis.
- Indoor farming is a method of growing crops or plants, usually on a large scale, entirely indoors. This method of growing crops utilizes grow lights or a combination of artificial light and sunlight in a greenhouse setting.
Sources
- https://en.wikipedia.org/wiki/Grow_light
- https://modernfarmer.com/2018/03/grow-lights-for-indoor-plants-and-indoor-gardening/
- https://www.maximumyield.com/definition/2151/indoor-farming
- https://www.gardeners.com/how-to/gardening-under-lights/5080.html
- https://medium.com/@MarkCrumpacker/4-facts-you-need-to-know-about-leds-and-vertical-farming-bb1bed18064d
- https://www.thoughtco.com/photosynthesis-facts-4169940
Acknowledgements
- Storyline graphic from seedstorylines.org.
- Phenomenon chart adapted from work by Susan German.
German, S. (2017, December). Creating conceptual storylines. Science Scope, 41(4), 26-28.
German, S. (2018, January). The steps of a conceptual storyline. Science Scope, 41(5), 32-34. - Desktop Greenhouses designed by Alisha Hill, National Center for Agricultural Literacy.
Recommended Companion Resources
- AgBadging Field Guide
- Build Your Own GrowLite
- Buried Seeds, Buried Treasure
- Classroom Aquaponics Kit
- Desktop Greenhouses Kit
- Gardening in a Box
- GrowLab: Classroom Activities for Indoor Gardens and Grow Lights
- Indoor Gardening Curriculum
- Logan's Greenhouse
- Outdoor Farm, Indoor Farm
- Photosynthesis Video
- SpaceLite (Plant Light)
- Test Tube Hydroponics Kit
- The Chloroplast video
- The Magic School Bus Gets Planted: A Book About Photosynthesis
- Timelapse: Photosynthesis Seen from Space
Author
Organization
| We welcome your feedback! If you have a question about this lesson or would like to report a broken link, please send us an email at matrixelearning@gmail.com. If you have used this lesson and are willing to share your experience, we will provide you with a coupon code for 10% off your next purchase at AgClassroomStore. |
State Standards for Minnesota
NEW 2nd Grade: Science
Life Science
- 2L.4.1.1.1 - Construct an argument with evidence that evaluates how in a particular habitat some organisms can survive well, some survive less well, and some cannot survive at all. (P: 7, CC: 2, CI: LS4, ETS2) Emphasis is on the interdependence of parts of a system (organisms and their habitat). Examples of habitats should include those found in Minnesota, such as a wetland, prairie, or garden. Examples of evidence may include needs and characteristics of the organisms and habitats involved.
NEW 3rd Grade: Science
Life Science
- 3L.4.2.1.1 - Obtain information from various types of media to support an argument that plants and animals have internal and external structures that function to support survival, growth, behavior, and reproduction. (P: 8, CC: 4, CI: LS1) Examples of structures may include thorns, stems, roots, colored petals, heart, stomach, lungs, brain, and skin. Examples of media may include electronic sources.
NEW 4th Grade: Science
Earth and Space Science
- 4E.4.2.2.1 - Obtain and combine multiple sources of information about ways individual communities, including Minnesota American Indian Tribes and communities and other cultures, use evidence and scientific principles to make decisions about the uses of Earths resources. (P: 8, CC: 4, CI: ESS3, ETS1) Examples of cultures may include those within the local context of the learning community and within the context of Minnesota Examples may include balancing the water, soil, wildlife, plant, and human needs to support sustainable use of resources
NEW 5th Grade: Science
Life Science
- 5L.1.2.1.3 - Plan and conduct an investigation to obtain evidence that plants get the materials they need for growth chiefly from air and water. (P: 3, CC: 5, CI: LS1) Examples of plants may include aquatic plants that grow without soil. Examples of observational evidence may include growth patterns for plants grown in different environments.

